CentOS7에서 Apache 2.4 컴파일 설치 하는 방법
1. 필수 툴 설치
# yum install gcc gcc-c++ expat-devel wget openssl-devel epel-release
2. pcre 다운로드 및 컴파일
# mkdir /samso/download
# cd /samso/download
# wget https://sourceforge.net/projects/pcre/files/pcre/8.45/pcre-8.45.tar.gz
# tar zxvf pcre-8.45.tar.gz
# cd pcre-8.45
# ./configure --prefix=/usr/local
# make
# make install
3. apr-util, apr, httpd 다운로드 및 컴파일
# cd /samso/download
# wget http://mirror.apache-kr.org/httpd/httpd-2.4.55.tar.gz
# wget http://mirror.apache-kr.org/apr/apr-1.7.2.tar.gz
# wget http://mirror.apache-kr.org/apr/apr-util-1.6.3.tar.gz
# tar zxvf apr-1.7.2.tar.gz
# tar zxvf apr-util-1.6.3.tar.gz
# tar zxvf httpd-2.4.55.tar.gz
# mv apr-1.7.2 ./httpd-2.4.55/srclib/apr
# mv apr-util-1.6.3 ./httpd-2.4.55/srclib/apr-util
# cd /samso/download/httpd-2.4.55
# ./configure or ./configure --prefix=/samso/apache2.4.55 // 설치 경로 지정 가능
※ 기본 경로 : /usr/local/apache2
# make
# make install
※ configure에 자주 사용하는 기능을 미리 enable 할 수 있다.
ex) ./configure --prefix=/samso/apache2.4.55 --enable-proxy --enable-rewrite --enable-so --enable-speling --enable-ssl --enable-vhost-alias --enable-mods-shared=all --enable-deflate --enable-modules=shared --enable-modules=shared --enable-mpms-shared=all --enable-http2 --with-included-apr --with-included-apr-util
4. httpd.conf의 ServerName 수정
# vi /usr/local/apache2/conf/httpd.conf
파일의 193번째 라인
ServerName localhost:80
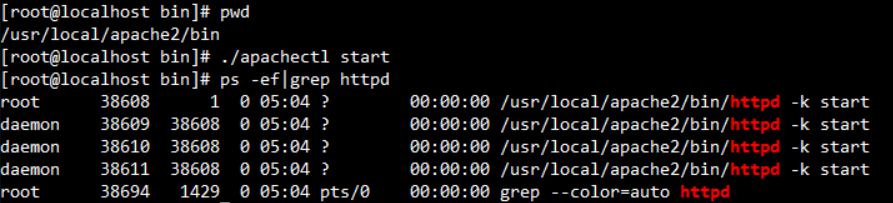
5. apache 실행 및 확인
# cd /usr/local/apache2/bin
# ./apachectl start
# ps -ef | grep httpd
6. apache 테스트
1) 내부 작동 테스트
# wget http://127.0.0.1
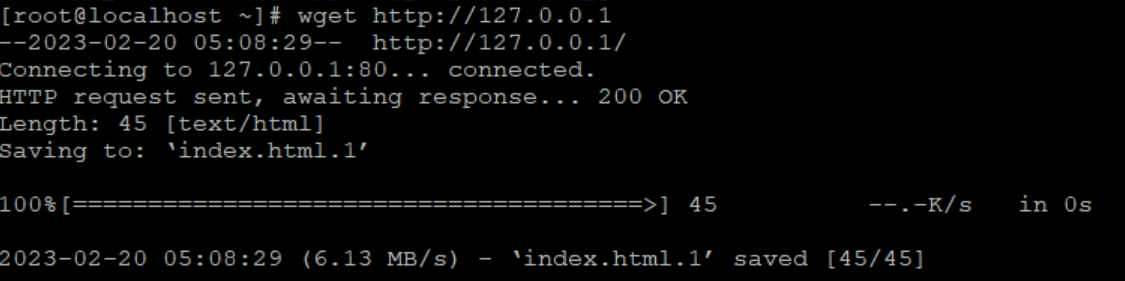
/usr/local/apache2/htdocs 경로에 위치한 index.html이 다운로드 된다.
2) 외부 접근 테스트
방화벽이 실행되고 있고, 80포트에 대한 허가가 없다면 외부에서 접근할 수 없다.
2.1) 방화벽 80포트 허용하기 -- 테스트의 경우 방화벽을 내려도 무관
# 방화벽 실행 확인
# firewall-cmd --state
running
# 현재 사용중인 Zone 확인
# firewall-cmd --get-default-zone
public
# 80포트 허용
# firewall-cmd --permanent --zone=public --add-port=80/tcp
success
# 방화벽 재시작
# firewall-cmd --reload
success
# 방화벽 적용 확인
# firewall-cmd --zone=public --list-all
외부에서 접근이 되는지 테스트해보려면 브라우저에 IP 또는 도메인을 입력하면 된다.

index.html 페이지 접근
7. httpd service 등록 ( init.d, systemctl )
둘 중 한가지 선택해주시면 됩니다.
1) /etc/init.d (CentOS 6이하)
# cd /etc/init.d
# cp /usr/local/apache2/bin/apachectl ./httpd
# vi httpd
맨 위에 다음과 같이 입력한다.
#!/bin/sh
# httpd Startup script for the Apache HTTP Server
# chkconfig: 345 85 15
# description: Apache is a World Wide Web server. It is used to serve
# processname: httpd
# pidfile: /usr/local/apache2/logs/httpd.pid
...
저장 후에 서비스에 등록한다.
# chkconfig --add httpd
# chkconfig --level 345 httpd on
# chkconfig --list

# service 명령어 테스트
# service httpd stop
# service httpd start
2) systemctl (CentOS 7이상)
# cd /usr/lib/systemd/system
# vi apache.service
[Unit] Description=apache2 Service
After=syslog.target
After=network.target
[Service]
Type=forking
ExecStart=/usr/local/apache2/bin/apachectl start
ExecStop=/usr/local/apache2/bin/apachectl graceful-stop
ExecReload=/usr/local/apache2/bin/apachectl graceful
User=root
Group=root
[Install]
WantedBy=multi-user.target
※ 경로를 따로 지정하면 service 파일에서 수정 필요
//데몬 재시작
# systemctl daemon-reload
//linux 재시작 시 apache 자동 실행 등록
# systemctl enable apache
CentOS7에서 Apache 2.4 yum 설치 하는 방법
1. httpd 설치
# yum install httpd
설치가 완료되면 rpm을 통해 확인해보면 됩니다.

또는 # httpd -v 를 입력하여 버전 / 설치 확인이 가능합니다.

yum으로 설치하면 /lib/systemd/system 에 httpd.service가 자동으로 등록 됩니다.
# systemctl start httpd // 서비스 시작
# systemctl enable httpd // 서비스 부팅될 때 시작
2. 방화벽 설정
방화벽이 실행되고 있고, 80포트에 대한 허가가 없다면 외부에서 접근할 수 없다.
2.1) 방화벽 80포트 허용하기 -- 테스트의 경우 방화벽을 내려도 무관
# 방화벽 실행 확인
# firewall-cmd --state
running
# 현재 사용중인 Zone 확인
# firewall-cmd --get-default-zone
public
# 80포트 허용
# firewall-cmd --permanent --zone=public --add-port=80/tcp
success
# 방화벽 재시작
# firewall-cmd --reload
success
# 방화벽 적용 확인
# firewall-cmd --zone=public --list-all
서비스와 포트 상태를 확인
# netstat -ntpl | grep httpd or netstat -tnpl | grep 80

웹으로 접속 해보면 컴파일 설치와 다른 페이지가 나옵니다.

3. Apache 파일 설정

테스트 페이지의 문구를 읽어보면 /var/www/html에 컨텐츠를 추가하라고 합니다.
그리고 현재 테스트 페이지는 /etc/httpd/conf.d/welcome.conf 에 설정되어 있다고 합니다.
컨텐츠를 만들어서 보여주기 위해서는 Config 파일을 읽어봐야 합니다.
Config 파일은 /etc/httpd/conf 디렉토리 안에 httpd.conf 파일로 존재하고 있습니다.
이 파일은 httpd에 대한 중요한 설정들이 들어 있습니다. (서비스 경로, 포트 경로, 로그 설정 등)
# vi /etc/httpd/conf/httpd.conf 로 접속 하여 설정 값을 수정해 봅니다.

3.1) 기본적으로 알아야 할 정보
ServerRoot : 웹 서비스(httpd) 파일의 경로
Listen : 웹 서비스가 사용할 포트 (default 80)
DocumentRoot : 웹 서버에 업로드할 파일들의 경로
DirectoryIndex : 서비스할 페이지 명
LogLevel : 웹 서비스 로그 레벨
4. 서비스 페이지 생성
DocumentRoot 와 DirectoryIndex 설정을 확인했으니 /var/www/html 에 서비스 페이지를 생성해봅니다.
# cd /var/www/html
# touch index.html // index.html 라는 빈 파일을 생성합니다.
# vi index.html // html 형식에 맞도록 파일을 수정합니다.

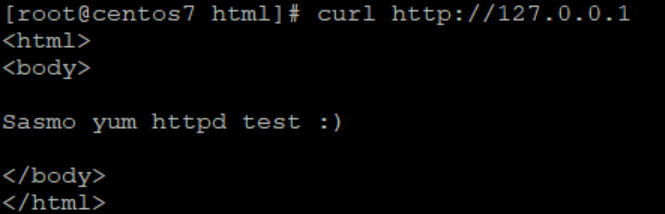
웹으로 접속 해보거나 서버에서 curl 명령어를 통해 테스트
# curl http://127.0.0.1
'Server > Web' 카테고리의 다른 글
| Web - Apache를 이용한 로드 밸런서 설정 가이드 (0) | 2024.05.28 |
|---|---|
| Web - Apache mod_rewrite 사용 변수 모음집 (0) | 2024.05.18 |
| Web - Apache 웹 서버에서 Redirect / Rewrite 방법 (0) | 2024.05.17 |
| Web - Apache SSL 인증서 비밀번호 자동입력 / 비밀번호 삭제 (2) | 2023.10.27 |
| Windows - Apache Web Server 설치 (4) | 2023.04.18 |


